One of the items on our holiday countdown list this year was to make ornaments to hang on the Christmas tree.
To make something that we could treasure and hang on our Christmas tree for years to come.
The best way to do that? A hand print ornament that I can look at each year to remember just how small they once were.
These ornaments are so incredibly simple to make and are absolutely adorable once they’re finished!
Made from a simple salt dough, once they’re dry they are heavy and durable (but can still be broken so you’ll want to be careful). And the best part is, you probably already have everything you need to make them!
To make your own ornaments you’ll need:
- 1/2 cup All-Purpose Flour
- 1/2 cup Salt
- 1/4 cup Water
- Paint
- Mod Podge
- Ribbon
Continue below for the full step by step instructions or hit play on the video below for a visual tutorial.
To make your salt dough, mix your flour, salt, and water in a bowl. Knead them together until you have a soft dough that you can easily form a ball with.
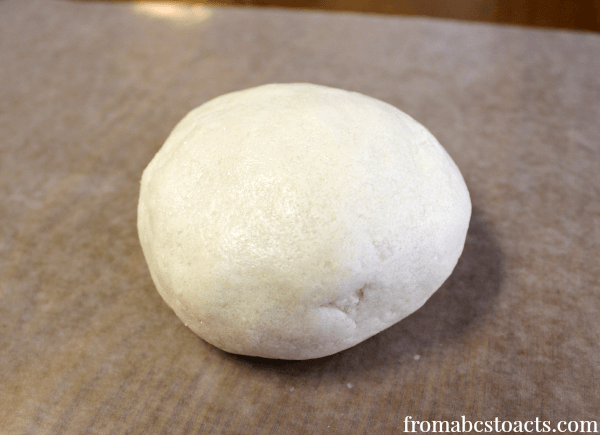
It will stick to whatever you set it down on so either flour your surface or place it on a sheet of wax paper.
Working quickly so your dough doesn’t start drying out, flatten it out and press your child’s hand into the dough creating their hand print.
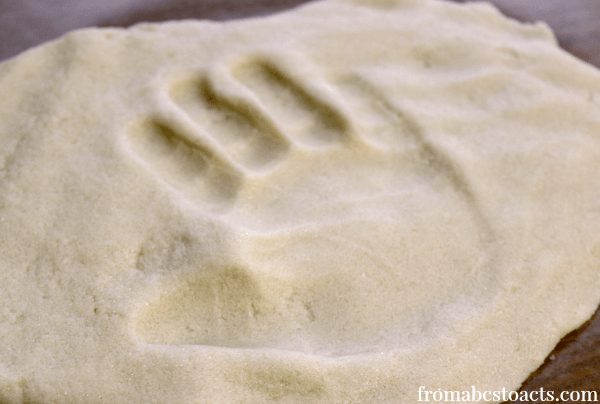
One thing to remember is that salt dough is heavy when it dries so remember that when you are deciding on the thickness for your ornament.
Once you have a good hand print, use a butter knife dipped in flour to cut your hand print out and lay it on a cookie sheet. Make sure that you cut a small hole at the bottom of your hand print so that you will be able to string a ribbon through to hang your ornament.
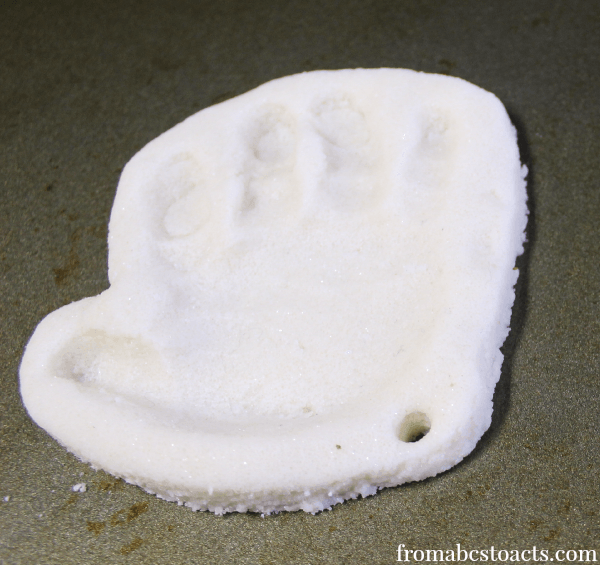
Your ornaments will need to be completely dry before you try to paint them so stick them in the oven at 200º for 3 hours (or until they are completely dry depending on their thickness).
Once they’ve completely cooled, start creating your Santa!
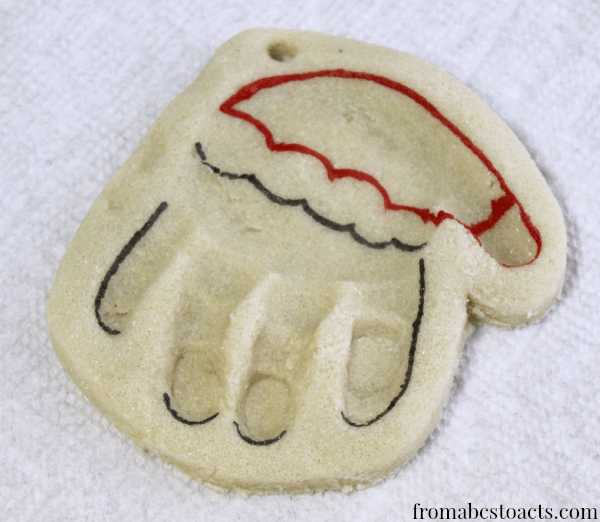
You can section off the parts of Santa’s hat and beard before you get started to make it a little easier. We just used a black permanent marker on the beard and the bottom of the hat and red paint for the rest.
Now you’re ready to start filling St. Nick in. You’ll want to fill in the rest of your hat with that same red paint, grab some white for the beard and to finish the hat off, and for the face you’ll want to see if you can find either a beige or flesh colored paint. If you’re unable to find one that you like, you can mix a few colors together to make your own. For our Santa, we wound up mixing this with a more antique white paint and I love the way it turned out!
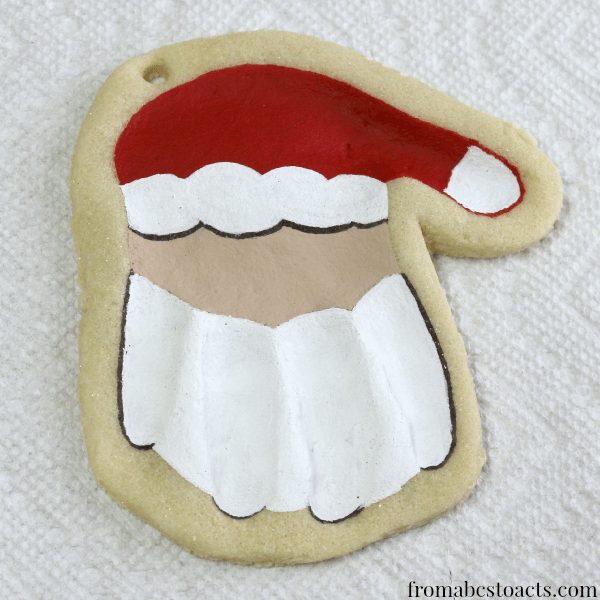
Of course, once your main layers are dry, you’re going to want to give your Santa a cute little face 🙂
Again, you can use a black permanent marker for the eyes and the outlines of his mustache and it will work just fine.
We decided to jazz our Santa up a bit with a little metallic silver paint around the edges but you could just leave him the way he is if you’d like. He’s adorable either way!
Finally, once you have your Santa just the way you want him, coat your entire ornament in Mod Podge to seal it. Both the original version and the spray sealant work perfectly.
Now grab a ribbon or some string and hang him on the tree!
So curious! Do you think it would work to use Sharpie to color the entire thing rather than using paint? Just wondering if it might be any faster….
Honestly April, I have no idea. My only concern would be that the ink would soak into the salt dough too much and not really look all that great. We have tried paint pens with some of our ornaments though and those turned out great!
Hi Amber!
We can’t wait to make these! My only question is what type of paint brushes do you feel worked best to paint these? Thank you!
Hi Jennifer! Yay! I bet they’ll be adorable 🙂 Any soft paintbrush should work just fine for these (we’ve used a couple of different kinds over the years). The cheap plastic ones that come in the watercolor sets don’t work very well (they tend to leave pretty bad brush marks), but anything else with a softer brush will work. Hope that helps!
How. Many ornaments from this recipe?
Hi Connie! This recipe makes 1-2 ornaments depending on their size. Hope that helps!
Going to do this with the grandkids tonight
Hi!
I am a preschool teacher and would like to make these with my entire classroom (30 students) Can I make a large batch ahead of time? Would I need to refrigerate it? Thanks so much!
I’ve made large batches a time or two Mary and as long as you store the dough in an air tight container, it should last for a couple of days without drying out too much. Hope that helps!
I was excited to make this ornament with my grandson who is a one year old. I wasn’t sure how it would work out. I just got lucky I guess a week before Christmas. I got three of his hand from the dough (two came out really good). A surprise gift for his Mom & Dad and other grandma. Thank you for sharing.
Yay! I am so glad it worked out so well for you and I am sure they loved their gifts!
Does in matter what type of salt? We only have sea salt so the granules are larger, does anyone know if it makes a significant difference?
I made these and they turned out adorable. Two days after I painted them I used spray mod podge to coat them. It caused the permanent marker to run. Did this happen to anyone else? Should I use a different type of mod podge?
The whole thing is beautiful & great………except the metallic paint! I used the exact kind in the picture but mine is way to grey looking. The picture looks more pearl metallic. I would suggest leaving it off. Love these, they are christmas presents for several family members. Thank you.
These are adorable! Perfect for a gift to grandma from our 9 month old. 🙂 I have a question though (I’m sorry if you’ve already answered.. didn’t get a chance to read all the comments).
-It didn’t seem to but was wondering if the permanent marker you used (Sharpie?) bled at all when decorating? It’s definitely needed for the sharp lines in the beard and face, just wondering if you ran into that problem at all. And just regular old acrylic paint?
Thanks again, I can’t wait to do this with my little one! Happy Holidays to you and yours! 🙂
Thanks Kate! We didn’t have any issues with the Sharpie bleeding. I think, if you make sure it’s completely dry before adding the paint, you should be just fine 🙂 And yes, we just used regular old acrylic paint that you can find at Walmart or Hobby Lobby. Hope that helps!
Love these!! Question. Do they have to be put in the oven or can they just be left out to dry?
Thanks!!
Thanks Sharon! Honestly, I haven’t tried just leaving them out but I don’t think it would cause any problems. All you’re doing by putting them into the oven is drying them out, you’re just speeding up the process 🙂 It should work but just be prepared for them to take quite a while to completely dry.
You can leave them out to dry but it can take several days to weeks to fully harden depending on how thick you make the ornaments. I did a valentine’s day gift with salt dough a couple of years ago and they took a couple months to fully dry and harden because I wasn’t sure what to put my oven on. My project was pretty thick, about a quarter of an inch. The thinner they are the faster they’ll dry. Hope that helps.
These are super cute! my questions is, where did you use the mod podge? did you put it over the paint?
Yep! Sorry, I should have clarified that 🙂 Once the paint is completely dry, just cover the entire thing in Mod Podge. It just seals everything and makes it a little shiny (depending on the type of Mod Podge you use).
How many handprints can you make with this recipe?
Thanks
We honestly had each child mix up their own recipe but a single batch of ingredients could easily make 2-4 ornaments depending on how big the hand prints are 🙂
Do you have to dry them out immediately or could I bring them home after school to put in the oven?
That should be fine Alicia 🙂 Really all you’re doing by putting them in oven anyway is just drying them out faster.
Hi I am a year 5 teacher and love this idea. I want to use it for an xmas workshop day. how many ornaments roughly would this mixture make?
My grandson and I made these today. We were able to make two hand prints and a couple of star wars ornaments along with a heart for his mom.
So cute! I am going to do this with my grandchildren, who will love this. Just a thought, did Hayley use plain flour or self rising? Maybe could be the problem. Thanks for this cute idea.
What is the silver metallic paint brand you used? I tried clicking the link but it didn’t work. Thanks!
Should be working now Jackie! But really any brand will work. Whatever acrylic paints your local craft store has, check those to see if they have a metallic silver version. They usually do 🙂
Where can I get Mod Podge or something like it and what kind of paint did you use?
You should be able to find Mod Podge either at your local Walmart or any craft store like Hobby Lobby or Michaels. For the paint, we just used regular acrylic craft paint 🙂
This is such an awesome idea… and the kids like getting their hands messy anyway! 😉
Definitely!
I am going to try this with my grandchildren as a gift to their parents. What type of paint should I use?
We just regular acrylic craft paint and that worked wonderfully! You can find it either at Walmart or in any craft store 🙂
I have tried this twice now with my daughter, and each time they have blown up like puff pastry! What am i doing wrong??
Try turning the heat down on the oven Hayley. It took us a while to find the right temperature for us since every oven is different but if they are puffing up, it means that you basically cooking them and you don’t want to do that. You just want to dry them out slowly over a long period of time. Try turning your oven down to 100 degrees and they’ll probably turn out just fine 🙂 You might have to up the time a bit though. Hope that helps!
I am in love with these! I would love to make them with my PreK/K class to send home as gifts…about how many ornaments were you able to make with the amounts of ingredients you listed? Thanks so much!
Thanks Charlene! We actually mixed a new set of ingredients for each ornament we made so that each child could do their own but you could easily make 2 ornaments with the amount of ingredients listed 🙂
Oh this is so magical! Something to treasure for years to come 🙂
#Pintorials
It is already one of my favorite ornaments on the tree 🙂
We did some salt dough ornaments last year, it’s our tradition! This will be an awesome way to make them this year! Thanks for the inspiration!!
I’m glad you like them Savanna! We made one for each of the kids and they are just so adorable once they’re on the tree 🙂
This is gorgeous! We are making salt dough ornaments and one of them will have to look like this!
Thanks Herchel! I am so happy with how they turned out 🙂
I LOVE THIS! It turned out BEAUTIFULLY!
Thank you Becka!
I have a question…these are adorable by the way. What did you do to make the Santa’s face this color? Thanks…and Have a Merry Christmas!
Ok, this is freaking ADORABLE! I am totally doing this!
Haha thanks Echo! They were fun to make and they look great on the tree 🙂